Having a backyard piggery in the Philippines is pretty common but in this blog we'll tell you how we started and how to avoid a lot of our rookie mistakes
We started our little Piggery in early October 2016, with just 2 stalls and 5 piglets
Wilbur, Charlotte, Claire, Charlemagne and Daphne 4 Guilds 1 Male. Currently we have 6 grown healthy Sows and one young Boar
So with our pigs, a place for them to sleep and food for them to eat we felt ready to start our business but not thinking a head would get us into some trouble
The Early Problems
Pigs need large amounts of water especially in humid climates
Within a week or two our caretaker started to complain about the difficulty of getting water to the pigs, we were getting water from a well in buckets and bringing them to the stalls. Pigs need a lot of water so this became very tiring we needed to solve this situation as soon as possible
To solve our water issue we picked up a really nice water pump, it pumps water from the well into large storage containers which then allows us to run water directly to the pens using pig water drinker nipples.
If you're even considering starting a piggery a water pump is a requirement unless you're going to use expensive city water
Septic Tank
Septic tanks and Piggery's go together like birds to feathers if you plan on having more than one pig then you're going to need a septic tank there is just no getting around it.
We've constructed 2 tanks under large farrowing pens, this has made waste management easier and our neighbors happy because there is no more smell
We hit a underground spring during construction of the septic tank and had to pump the water out of the hole before we could continue
First Tank Completed and ready for use
Pig Feeds
There are a few ways to feed your fast growing pigs, you can go 100% commercial feeds which is very expensive but give fast healthy results provided you use a trusted brand
The 80/20 Method
80% Commercial Feeds and 20% supplemental this is our preferred method of feeding our pigs for example mixing your store bought feeds with things like Rice Husks can greatly prolong the time between needing to buy more feeds
Rice Husks
Kangkong
You can buy them or find them growing wild Kangkong or Water spinach is a great addition to you pigs diet as well as great for humans too
Cassava
We've also used Cassava Root in addition to our feeds The pigs love it and so do we when making Cassava Cake :) just make sure you boil it first before giving it to the your pigs
also note that some people suggest not giving it to pregnant sows however there is no evidence that it effects them in a negative way
Corn, Corn Cob and Corn Husks
Dry corn is very cheap to add to your pigs overall diet
in the Philippines and you'll thank us later :)
Camote Tops
Not only are they good for your pigs to eat they're also great for getting rid of diarrhea
Earning Money
How will you earn money from your Piggery?
There are a few clear options
Fattening: Raising piglets for 3-4 months getting them as plump as possible and selling them at market per-kilo or individually to local customers
Selling Piglets: Every litter you sell your piglets after 4 weeks of nursing typically for P2,500-2,800 each depending on size and quality of the piglets
Selling the Meat: Same as Fattening but you do the butchering and selling of the meat yourself, Typically credit is given to well known customers and they pay at a later agreed upon time
Lechon Service: A customer buys a fat pig from you and you lechon the pig for them, this is a premium service you can charge more however people usually only order such an expensive treat for special occasions so it will be rarely needed
Budget budget budget
You should keep a detailed monthly invoice for all the money coming in and going out its really important because you'll need to know if you're actually making a profit, breaking even or in the black.
Feed Costs
Vet Costs
Electric Costs
Piglet Sales
Caretaker Fees
Boar or AI breeding costs
Breeding Pigs
If you decide to breed your Sows you have 3 options
1.Boar Stud Service - You'll have your local boar owner bring the male pig to your piggery
and breed with your sow,
2. Artificial Insemination - You'll pay to have a local breeder or vet insert live boar sperm into your sow
3. Raise a Boar Just for Breeding
Tools all Piggeries should have
Farrowing Cages
Farrowing Cages are important when your sows are giving birth they limit the mobility of the sow and reduce the chances of the Mother stepping, kicking, or laying on the piglets and killing them
Welder
A welder can be invaluable for repairing farrowing cages, and pig pen gates, pigs are very powerful animals and can cause a lot of wear and tear on their environment, you'll want to be able to make repairs quick and fast.
Watering Nipples
We strongly recommend setting up a water system using pig watering nipples, these allow the pigs to get water whenever they need it, cuts down on waste and open water sources that can lead to disease
Our own transportation
Recently we were able to purchase a motor bike and sidecar , we bought them separately witch comes with its own pros and cons.
The Bike
The Motorcycle is a Rusi 175 we purchased this bike from a family member in like new condition for P17,000 good deal considering brand new these retail for P40,000
Sunshine and myself had been wanting to do a local feeding program for over a year, we were inspired by Ned over at MyPhilippineDreams who did something very similar a few years back.
With just P1,900 invested in the program we were able to feed over 30 of the neediest people in Sunshine's community
Deciding what food you're going to serve
We'd discussed Pancit, Spaghetti, Rice Porridge and a few other choices. Pancit and Rice Porridge were the least expensive food choices to buy and cook in bulk but we decided for our first try we'd serve the always popular Spaghetti. Many of the children we fed have never tasted good quality Filipino Style Spaghetti so this would be a real treat for them.
Shopping!!!
6 Filipino Style Spaghetti kits P129 each
1 Large pack of Big Shot Hot dogs 1 Large can of Corned Beef 2 packs of Eden Cheese 3 packs of Styrofoam Contains and a few unlisted expenses
Cooking the Food
Cooking in bulk brings its own challenges but Sunshine and her mom worked hard to make sure everything turned out perfect.
Packing and Distribution
We made sure that all 30 containers were filled with large portions as some of them would be taken home to feed more than one person
Distribution
Just a few people getting their food, some people got more containers based on the size of the family
She has a bag full of yummy spaghetti that will surely put many smiles on peoples faces :) Thanks for your help.
Helping people who really need help makes you feel good inside knowing that someone won't be going to bed hungry was worth all the challenges, we plan to do more in the future switching up the menu every once in awhile. Sunshine and I hope this inspires you to help as many people as you can every little bit helps
Thanks for Reading
Thursday, May 18, 2017
Please forgive any punctuation or grammatical errors I'm not a writer just trying to share our experiences
In early 2016 we started talking about building our own Nipa Hut, it started out as a joke but as time went on we started to really look into the idea of what it would cost as far as materials and labor.
Sunshine and I started searching the internet looking for designs and examples of what we'd like to build and after months of looking talking debating and going through several budgets we finally settled on one based off the Nipa Huts at the Bamboo Heaven Resort in Thailand, we both felt that
the design and quality of these Nipa Hut's were absolutely beautiful.
We quickly realized that this design was just simply out of our budget because we got an estimated price cost of over P48,202 Plus Labor and our budget was only P30,000 plus the cost of labor so we had to go to Plan B.
During our search for designs we came across the Huts at the Nipa Hut Village Located in Bohol Philippines and the Huts at the Koh Mook Coco Lodge in Thailand
We decided to draw inspiration from both taking the simplicity of the outside of the hut from the Nipa Hut Village while having the inside of our hut resemble more from the Koh Mook Coco Lodge
Above shows how the outside of the huts look at the Nipa Hut Village
Shows how the Bathroom or CR's look in the Koh Mook Coco Lodge
Above shows our final design choices we actually printed this picture out and gave it to our builders and said we want you to recreate what you see
Materials Materials ..... and More Materials
In early February 2017 we began the long process of buying our materials, in the Philippines its not always as easy as taking at trip to Home Depot with your list. We wanted the best quality materials for the lowest prices and that would involve a lot of sweat and tears and a little blood too lol.
The main resource you need when building a Nipa Hut is BAMBOO and a lot of it, thankfully Sunshine's uncle knew where to get it for a good price but it involved multiple long and sometimes dangerous trips to the High mountain regions where you can find materials much cheaper than you can in the big cities like Manila and Cebu. We ordered about 90+ long pieces of bamboo this process took about 2 weeks because the men had to go into the forest and cut down our order by hand with bolo's aka machetes
Delivery Time!!!!!!!
February 21st 2017
Well needless to say when something this large gets dropped off at your front gate on a cart pulled by an Carabao / Ox the neighbors start paying attention lol. When I first saw this stack I was a little perplexed its hard to find one stick of bamboo that wasn't crooked but it turns out this was normal.
Above Shows just some of the Lumber we used in construction the price of lumber is so high in the Philippines we had to think outside of the box Sunshine's Uncle who's also our Foreman for all of our projects again went above and beyond for us by purchasing Trees on some of his family lots and having them rough cut by chainsaw by another gentleman Getting the lumber this way saved us literally Thousand of Pesos that you'll see we needed when other little things popped up.
Amakan Delivery March 16th 2017
Used for the walls of the Hut
Toilet 2 for one sale lol
Miscellaneous items (find the cat )
Hollow Blocks
Cement
Water and Sewer pipes
Kilos and Kilos of Nails
Varnish
Sheets of Steel
Rebar
OKAY!!! we have the materials but who's going to build this thing?
When it came time to build our hut we weren't worried we'd made a deal with a carpenter who happened to be apart of Sunshine's family, they were suppose to come as soon as we collected everything however some family drama made this impossible so they missed out on a good paying job and we ended up without builders. Thus the long search for the perfect carpenters began, we must've interviewed at least 7 builders the majority of them complained that they couldn't take the job because our roof design was too complicated, but finally we found 2 guys a master carpenter and his assistant. We feel lucky finding them and because they're family friends they gave us a good deal on the price and they're craftsmanship and work speed is top notch .
Labor Agreement
₱1,000 in advance and ₱500 per day payment due by the end of each week
this deal also included meals during lunch
Construction Begins March 16th 2017
Build Location Site (Mama's Garden)
Progress March 23rd 2017
These guys work Fast already you can see the framing done and the Nipa Leaves for the roof being put into place
We would have to rough cut more lumber to complete the large Porch
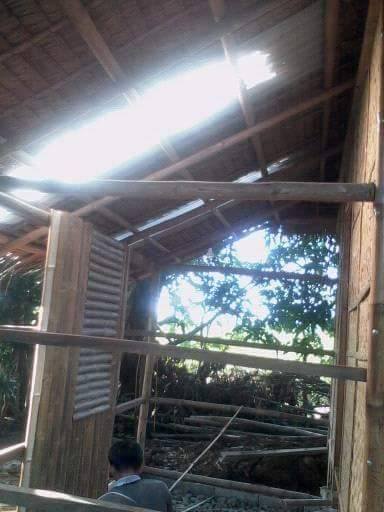
Shows a close up of the roof and trusses and bamboo scaffolding
Carpenters preparing the bamboo
Preparing the Lumber
Time for the Walls to go up
The above pictures show the Amakan walls going up from several angles you'll also notice that the family has already started enjoying the porch area :)
First look Inside
The Cool Shaded Porch
To my surprise the porch area became the most popular part of the Nipa Hut, the family comes to the porch to relax even taking naps in the Hammock, they say its in just the right spot that it catches the cool breeze and some even prefer to sleep on the porch at night rather than inside the main house due to the low temperature
We had a very nice sized bench built into the porch where a long time friend of the family and local wise man lolo loves to sit lol
Septic Tank Construction
Its a dirty job but somebody's gotta do it
The septic tank scared me because a few months earlier we put in a very large septic tank for Sunshine's piggery and ran into so many problems like hitting underground springs rain etc etc luckily this one was much smaller in scale and the only issue we ran into was having to buy 30 more hollow blocks to finish the job
This is a fairly simple and common septic tank done in the Philippines
Building the Bathroom CR
When it came to the bathroom we wanted it to look exactly like the bathrooms at the Koh Mook Coco Lodge Sunshine and I were very pleased at how close they came and in some areas surpassed the
Koh Mook Coco Design
Starting with the foundation
Instead of completely covering the bathroom roof with the Nipa leaves we had our builders put in 2 opaque poly-carbonate roofing sheets, it lets the sunlight into the bathroom and looks really good
The bamboo walls seemed to take the most time of any part of the construction due to the fact that the bamboo had to be honed and cut just right, our carpenters did a fantastic job
Above shows Sunshine's Uncle doing some cleaning underneath the bamboo shower mat
Update 1-20-2023
During the last few years we've changed a few things in the bathroom.
Water damage caused by taking baths started to eat away at the bamboo, to fix this we had our carpenter cut off the lower half of the wall and replace it with hollow blocks.
We've also replaced the bamboo stairs in Bathroom replacing them with concrete stairs
Deciding to install electricity
Making the move to install electrical to our modest Nipa hut came near the end of construction most of the major projects had been finished or near completion. Sunshine her uncle and myself talked about different ways to go about doing it and the cost that would be involved, we were first quoted ₱6500 to wire the whole hut keep in mind we'd just spent a lot of money already on the major construction and were shocked by the price.
I decided to postpone any decisions on it for awhile and went with the cheaper temporary solution of Solar Lighting
We put one solar light in the sleeping area one in the bathroom and one on the porch they put out a decent amount of light and served our purpose until we were ready to connect to the grid.
April 22nd 2017 we purchased all the materials needed to connect to the main electrical grid
Electrical Panel
Electrical Wire
2 Junction Boxes
4 Light Bulb Fixtures
4 Wall Plug outlets
light Switches
Cost ₱7,000 $150
We decided to go with a larger size panel so we can expand in the future that's why the cost is higher than expected.
One-thing I've noticed in the Philippines is i'ts who you know that can make all the difference we saved a lot of money on the installation because Sunshine has a retired electrician in her family who graciously agreed to help us.
At the end of the day I'm happy we bit the bullet and got the electrical installed, it was worth the effort and expense
Miscellaneous Projects
These are some of the projects we had our carpenters do in the last days of construction they include
Large double sized bed
kitchenette
Protective bamboo roof grid
Side porch railing
The Kitchenette
We put in a little kitchen in a little corner in the back of the Nipa hut nothing fancy a little sink with running water, counter space for small appliances in the future
Bamboo Roof Grid
Protects the roof from severe storms and typhoons
Side porch railing
Total Nipa Hut Costs And Stats
115 Square Feet or 10.6838 Square Meters "not including the porch area"
Total build Time 35 Days
"excluding weekends"
Labor: ₱17,500 Materials: ₱58,115
₱75,615
$1,557.46
A complete success just look at the smile on her face, the family loves spending time at the Nipa hut everything was worth it in the end.
Upcoming projects to the Nipa hut
Although Major construction has finished there are still several projects we will be doing in the future
Bathroom
For the CR we plan to install a Shower, Sink and finish the floor with pebbles and perhaps a few plants. Update we've completed most of what we wanted in the bathroom area however we will just tile the other half of the floor area with the same style of tile we used on the other half and keep it nice and simple. Sink, shower and everything else has been installed
8//8/19 Tiling the Bathroom a few years later
10/21/2017 installing Mirror and Shower
We ordered this nice mirror from Lazada 3 times because it broke during shipping twice but came undamaged the 3rd time, I think it looks lovely
The shower was shipped in from the United States it has a built in pump that can spray warm water from a bucket so no plumbing is needed and its USB rechargeable
6/24/2017 installing the Sink
Landscaping
The planting of flowers and hanging potted plants around the Hut is already going on now.
Half Loft
Construction of the loft started March 11th 2018
This little loft will be used for extra storage and expanded sleeping area
This addition was an additional ₱10,000 $200
1-19-2023
Finally added lights in the loft
Covering the bottom of the loft with Banig
Storage and Shelving
We've already begun to add bamboo corner shelving and I hope to add a wardrobe cabinet in the future.
5/21/2017
2/06/2019 2 year Maintenance Varnishing the Bamboo and Amakan
Every few years you have to put on a few layers of varnish to protect the Nipa Hut from weather and normal wear and tear, we're also fighting off some Termites these chemicals should help :)


 Not only are they good for your pigs to eat they're also great for getting rid of diarrhea


